A ceiling stain rarely starts where you see it. By the time water marks drywall in a bedroom or hallway, it may have traveled along roof decking, a rafter, insulation, or wiring before finding its way down. Knowing how to inspect attic leaks can help you catch a small issue early, protect your home’s structure, and avoid the far greater cost of widespread water damage.
For homeowners in Southern Westchester, the best time to look is often after a hard rain, wind-driven storm, or a stretch of melting snow. Still, a careful attic inspection is about more than finding drips. It is about identifying the path water took, separating a true roof leak from condensation or plumbing trouble, and recognizing when the evidence calls for a professional roof assessment.
How to Inspect Attic Leaks Safely
Start with safety, not speed. Attics have exposed framing, uneven flooring, low-clearance areas, and electrical hazards. Bring a bright flashlight, wear closed-toe shoes, long sleeves, gloves, and a dust mask if insulation or dust is present. Step only on ceiling joists or installed flooring – never directly on insulation or drywall. One missed step can put a foot through the ceiling below.
Do not enter an attic during active lightning, and do not touch wet wiring, electrical boxes, or fixtures. If you smell burning, see damaged wiring, or find standing water near electrical components, leave the area and call a qualified professional.
It also helps to inspect with a purpose. If a ceiling stain appeared after a storm, note its location downstairs before going up. Bring your phone to photograph what you find. Clear photos of damp wood, staining, or damaged insulation make it easier to track changes and explain the issue to a roofing contractor, plumber, or insurance representative if needed.
Check Soon After Rain, but Inspect on a Dry Day Too
An active leak is easiest to spot during or just after rainfall, but dry-weather inspections matter as well. Water marks, darkened roof sheathing, rusty nail tips, and compressed insulation can remain long after the actual dripping stops. If rain is not in the forecast, use your flashlight to inspect the attic slowly and systematically rather than assuming no visible drip means no problem.
Do not spray a roof with a garden hose from the ground or climb onto a wet roof to test an area. Water testing can be useful, but it needs to be controlled and performed safely. A poorly aimed hose can force water beneath shingles and create misleading results.
Start at the Roof Deck, Not the Ceiling Stain
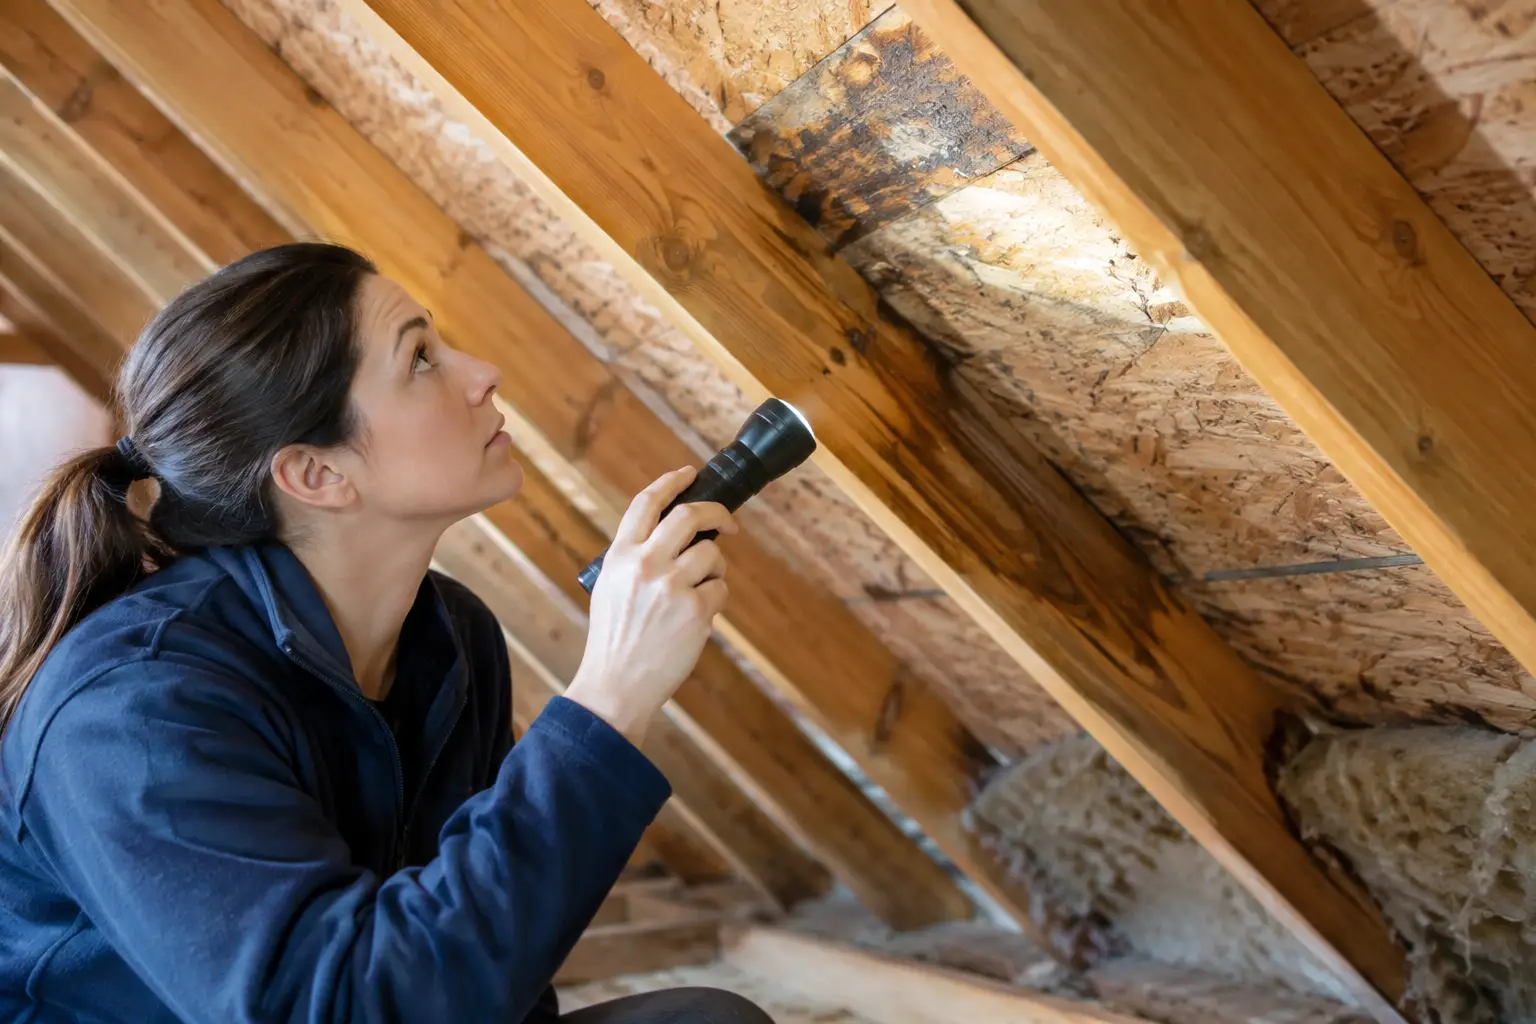
Once in the attic, look upward at the underside of the roof deck. Focus first on areas above the stain you noticed indoors, then expand your search uphill toward the roof ridge. Water follows gravity, but it can also run along framing members and travel several feet before it becomes visible.
Look for dark stains, damp plywood, swollen or delaminated sheathing, mold-like spotting, or wood that appears lighter or cleaner than the surrounding area. A fresh leak may make wood look darker and feel damp. An older leak may leave a brown ring, white mineral residue, or a stain with a dry center and darker edges.
Use your flashlight at a low angle across the roof deck. This can reveal a reflective sheen from moisture, small gaps, and raised fasteners that are harder to see with direct light. Pay attention to rusty roofing nails protruding through the sheathing. A few rusty nail tips can point to excess attic moisture, while a concentrated group near one area may help narrow down a leak path.
Inspect Roof Penetrations and Transitions
Many attic leaks begin where the roof surface is interrupted. Check around plumbing vent stacks, bathroom exhaust vents, attic fans, chimneys, skylights, solar penetrations, and any area where two roof planes meet. These locations rely on flashing, boots, sealants, and correctly layered shingles to direct water away.
From inside the attic, you may see staining or dampness near the base of a vent pipe, around a chimney chase, or beside a skylight frame. That does not always mean the visible penetration itself is the exact failure point. Water can enter higher up and follow the underside of the decking until it reaches an opening. Still, these areas deserve close attention because they are common sources of roof leaks.
Valleys are another concern. These are the channels where two roof slopes meet, and they handle a large volume of runoff during heavy rain. If you see repeated staining along rafters that border a valley, the roof surface and flashing above should be examined by a qualified roofing professional.
Check Insulation for the Leak’s Trail
Insulation often tells the story more clearly than the roof deck. Look for insulation that is matted down, darker than nearby material, crusty, or noticeably heavier. Wet fiberglass insulation loses performance, while damp cellulose can clump and settle. Even after it dries, it may no longer insulate as intended.
Do not pull large sections of insulation aside unless you can do so without damaging it or disturbing wiring. Instead, look for patterns. A narrow wet trail can indicate water running along a rafter. A broad damp area may suggest a larger roof issue, ice damming, or condensation. If insulation has been wet for an extended period, it may need to be removed and replaced after the source is corrected.
Also look down. Water can pool on top of ceiling drywall or around recessed lighting housings. If you find wet insulation near light fixtures, avoid touching the fixture and arrange for prompt professional help.
Rule Out Condensation, Plumbing, and Ventilation Problems
Not every attic moisture problem is a roof leak. In colder weather, warm humid air from the home can reach a cold attic and condense on nails, roof decking, and framing. This often creates widespread dampness, frost, or rusty nail tips across large portions of the attic rather than one defined wet spot.
Bathroom fans that vent into the attic instead of outdoors are a frequent cause. So are disconnected dryer ducts, unsealed attic hatches, and inadequate intake or exhaust ventilation. These issues can damage roof decking over time and may look similar to a leak from below.
Plumbing lines are another possibility. If moisture appears around a bathroom, laundry area, or vent stack, check whether there are pipes overhead or nearby. A plumbing leak may show up even during dry weather and can worsen when fixtures are used. Air-conditioning equipment or ductwork can also create water through condensation, especially if insulation is damaged.
The pattern matters. A problem that appears only after rain or snow points more strongly toward the roof. Moisture that develops during cold spells, after showers, or near mechanical equipment may have a different cause. Sometimes there is more than one issue, particularly in older homes where roof maintenance and attic ventilation have both been deferred.
Know What to Document Before Calling for Help
A few photos and notes can turn a vague concern into a clear diagnosis. Record the date, recent weather, the room below, and whether the area feels actively damp. Photograph the attic stain, affected insulation, and any nearby vents or roof features. If a ceiling stain grows after each storm, take a new photo from the same position so the change is obvious.
Avoid the temptation to cover the evidence with spray paint, caulk from the attic side, or a temporary patch that blocks inspection. Caulking a gap underneath the roof rarely fixes the source of water entry, and it can trap moisture where it does not belong. The right repair depends on whether the issue involves shingles, flashing, a pipe boot, ventilation, roof decking, or a non-roof source.
When an Attic Leak Needs a Professional Roof Assessment
Call for a professional assessment if you find active dripping, wet insulation, soft or damaged roof decking, visible mold-like growth, repeated ceiling staining, or signs of a leak near electrical components. You should also call if the roof is aging, shingles are curling or losing granules, or algae and moss growth are holding moisture on the roof surface.
A proper assessment should look beyond the obvious stain. The goal is to identify the entry point, evaluate the condition of the surrounding shingles and flashing, and recommend only the work the roof actually needs. In some cases, a targeted repair solves the problem. In others, cleaning damaging organic growth and preserving sound asphalt shingles may help protect the roof from further deterioration. A full replacement is not always the first or best answer.
Roof Rescue Southern Westchester approaches roof concerns with that same practical mindset: document the condition, explain the findings plainly, and help homeowners prevent avoidable expenses. If your attic inspection raises questions, schedule a free roof assessment before a small water path becomes a larger repair.
continue reading
Related Posts

Scarsdale gutter cleaning reviews can reveal a lot. Learn which details point to safe, reliable service, fair pricing, and lasting protection for homes.

Learn how to maintain roof valleys safely, spot early trouble, protect shingles, and know when a Southern Westchester professional should step in today.

Roof restoration can clean, protect, and extend shingle life. Learn when maintenance makes sense and when replacement is the safer call for your home.